Bringing MQTT authentication and REST together

For most non-trivial server software which run in production, authentication is a very important. Of course this also applies to MQTT brokers. Luckily the MQTT v3.1 specification includes a username and password authentication mechanism which most MQTT brokers implement.

While username/password files for authentication are sufficient for playing around with MQTT brokers, they are not sufficient for enterprise-grade production systems. When integrating a MQTT broker in existing software landscapes, typically there are existing databases and services.

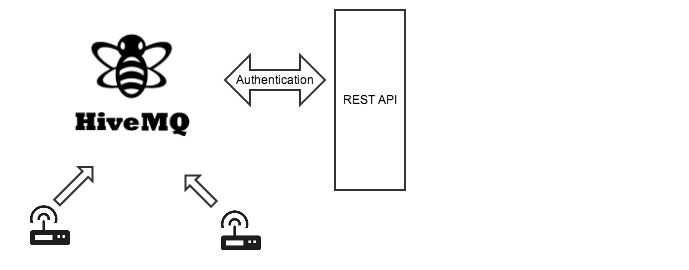
To demonstrate how dead simple it is to integrate an existing HTTP REST API for MQTT authentication, I created a simple HiveMQ MQTT broker plugin which delegates the authentication mechanism to the REST API (in this case a mock REST API). This API returns a JSON response which we parse in the HiveMQ plugin. It uses the excellent Apache HTTPClient from the HTTP Components project to integrate the authentication mechanism. You can find the project on Github here: https://github.com/dobermai/hivemq-rest-auth-plugin.

HiveMQ + REST API

This shows the whole implementation of the authentication mechanism. Feels like 90% exception handling 😉

The exact same mechanism can be used if you want to integrate MQTT authentication with some SOAP webservices, NoSQL databases, SQL databases, OAuth and anything you can imagine.

Make sure your MQTT broker of choice supports plugins. If you want to give the HiveMQ plugin system a shot, start here.

Installing a HiveMQ MQTT Server on AWS EC2 with enabled Websockets

To enable communication between MQTT devices, it’s necessary to use a MQTT broker as the central server for your M2M communication. Although there are some public brokers available like mqtt-dashboard.com, it’s a good idea to set up an own server for playing around. This post shows how to set up a HiveMQ MQTT server instance on Amazon Web Services Elastic Compute Cloud (EC2). As an additional goodie, we want to enable MQTT over websockets, so every browser can be a full-featured MQTT client!

Step 1: Create a new EC2 instance

General

The first step is to launch a new EC2 instance. In general it does not matter which OS you choose for HiveMQ as it runs perfectly on every major OS. Any Linux distribution should be fine, I will use a Ubuntu 12.04 LTS. To get started, a Micro Instance will be sufficient, if you need real power and throughput, you should start with more RAM and more vCPUs.

Security groups

Security Groups are very important to configure correctly, otherwise we won’t be able to connect to our server correctly.
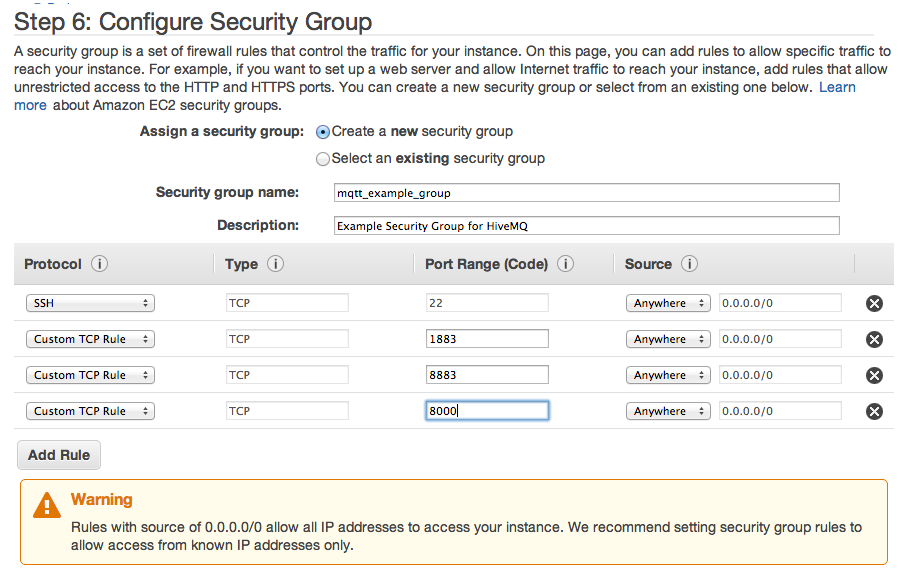
AWS MQTT Security Group Settings

AWS MQTT Security Group Settings

Open the following ports to the outside world for maximum MQTT pleasure:

  • 22: Needed for SSH. You probably lock yourself out if your don’t have this port open. Consider restricting this port to your IP adress(es) only.
  • 1883: The MQTT standard port
  • 8883: The MQTT standard port for MQTT over TLS.
  • 8000: The port we want to use for MQTT over websockets

Step 2: Download and install HiveMQ

After launching EC2 instance, we should SSH into it to install Java and HiveMQ. Depending on your OS, these commands might be a bit different.

Install Java + Utils

First we want to install Java and needed utilities. Execute the following commands:

sudo apt-get update
sudo apt-get install openjdk-7-jre-headless unzip

Now you can run

java -version

and the output should look like this:

java version "1.7.0_25"
OpenJDK Runtime Environment (IcedTea 2.3.10) (7u25-2.3.10-1ubuntu0.12.04.2)
OpenJDK 64-Bit Server VM (build 23.7-b01, mixed mode)

Install HiveMQ

Now we just have do download HiveMQ and unzip it. Execute the following:

wget --content-disposition http://www.hivemq.com/downloads/releases/latest
unzip hivemq-1.x.x
cd hivemq-1.x.x

Configure HiveMQ

HiveMQ comes with sensible defaults and we could get started without modifying the configuration if we don’t need websockets support. But since MQTT over websockets is just awesome, we’ll enable it:

Edit the conf/configuration.properties file and change the following values:

websockets.enabled=true
websockets.port=8000

Step 3: Start HiveMQ

Now just run bin/run.sh and HiveMQ should start up. Verify to see an output like this:

2013-11-30 23:04:46,872 INFO  - HiveMQ home directory: /home/ubuntu/hivemq-1.4.2
2013-11-30 23:04:46,876 INFO  - Starting HiveMQ Server
2013-11-30 23:04:50,225 WARN  - No license file found. Using free personal licensing with restrictions to 25 connections.
2013-11-30 23:04:50,832 INFO  - Activating statistics callbacks with an interval of 60 seconds
2013-11-30 23:04:50,833 INFO  - Activating $SYS topics with an interval of 60 seconds
2013-11-30 23:04:52,053 INFO  - Starting on all interfaces and port 1883
2013-11-30 23:04:52,069 INFO  - Starting with Websockets support on all interfaces and port 8000
2013-11-30 23:04:52,076 INFO  - Started HiveMQ 1.4.2 in 5207ms

That was all. Now you have a high performance MQTT server up and running in the cloud and you can start writing your MQTT applications on devices AND in the browser.

P.S. You can test the MQTT over websockets support with the nifty Websocket Browser Client here
EclipseCon 2013

I’m back from the EclipseCon Europe in Ludwigsburg and it was a great conference, I met many new and old friends and had lots of fun. The conference was very well organized and as far as I heard it was the biggest EclipseCon Europe ever.

Although I didn’t visit all the sessions I wanted to attend (to many good conversations in the hallways!), I at least managed to see the keynotes. :-) The keynote „Single Points of Failure: The Human Element of Software Engineering“ by Brian Fitzpatrick was brilliant. Very entertaining and non-technical keynote.

The second keynote, „Scaling Pinterest“ by Marty Weiner was very insightful and I was amazed and shocked how fast some startups like Pinterest grow and which problems they have to solve. I think Weiner had every NoSQL database you can think of on his slides.

When visiting the conference, it was clear to everyone, that M2M was one of the most important topics this year. In fact, most people were surprised how fast the M2M ecosystem of Eclipse has grown the last two years. Many people (jokingly?) speculated when the number of M2M projects will surpass the „classic“ Eclipse projects.

I talked with many people about MQTT, Eclipse Paho and HiveMQ and it was great to see that most people didn’t know much about MQTT before and most of them got very excited about this neat little technology. I personally think the conference was a big success for Eclipse Paho, there was a workshop (Christian Götz and me) about Java Paho and Javascript Paho, there was a regular Session about Paho and many people were also talking about it on the hallways.

Also, the other M2M projects on Eclipse were parts of many discussions on the hallways. I personally think there is some confusion about the focus of all these projects, but luckily Benjamin Cabé did a session about all these M2M projects and hopefully cleared the confusion for some people.

Although there are many people aware of the M2M projects in the Eclipse universe and these projects gained attention and traction recently, I think we have a long way to go until the M2M projects of Eclipse get „mainstream enough“ to be an integral part of every (Java) developers toolbox. But if Eclipse continues to follow the path they chose with M2M, I’m confident there is an even brighter future for the M2M projects and Eclipse as Foundation in General.

The slides for my sessions are available here:

Bringing M2M to the web with Paho – Connecting Java devices and online Dashboards with MQTT
M2M for Java developers – MQTT with Eclipse Paho

MQTT Table Football with Arduino, Raspberry Pi and Websockets

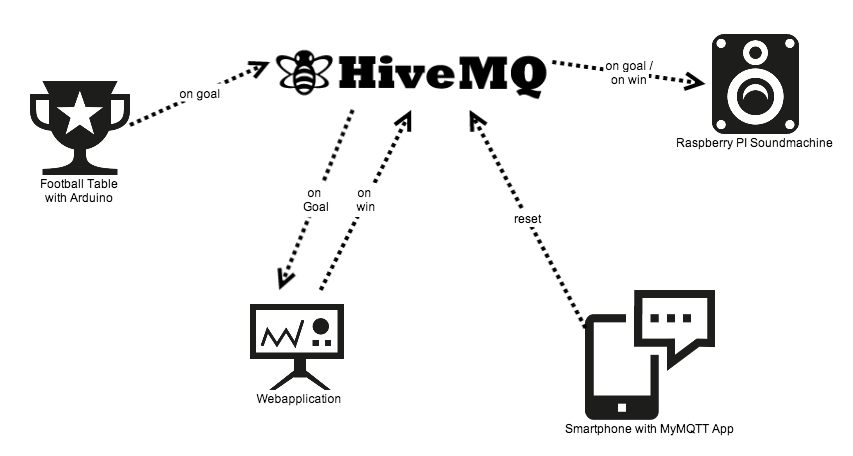
One of our main motivation refreshers in our office is our football table and we use it heavily every day. Someone came up with the idea: „Hey, why don’t we add some freaking MQTT support to the football table?“. Of course there was no argument against it and so we added the MQTT support and used a Arduino One for the job. To make things more interesting we decided against a mechanical goal trigger and used infrared sensors for detecting goals. To raise the motivation even more we used a Raspberry Pi to play goal celebration sounds on actual goals, notified via MQTT, of course.

To raise the nerd factor a bit more, we also decided to remove the built-in goal counter (which needed human interaction count up) and built a very basic small web application which acted as goal counter by using websockets to get MQTT messages when a goal was shot. This web application also implemented the logic when a player has won and published messages to the MQTT broker.

MyMQTT for Android was used as a remote control to reset the game with. With MQTT, of course.

The HiveMQ MQTT broker was the heart of the communication. All communication was done via MQTT with the HiveMQ broker.

Architectural Overview

MQTT Table Football Architecture

MQTT Table Football Architecture

In Action

We brought the football table to an event a few days ago and it was the absolute highlight of the event. Everyone had great fun.

MQTT IRC Bot/Bridge

It has been a long time since my last blog post. I was incredibly busy with HiveMQ and my focus pivoted to M2M in general and MQTT, an awesome, ultra-low footprint protocol for the Internet of Things, specifically. In the future this blog will also cover these things.

I had some spare time this weekend and decided to do some fun programming. The result was a MQTT-to-IRC or IRC-to-MQTT bridge bot. Although it is a fun project, it turns out that there are real useful use cases for that and because of that I decided to share it :)

How to use

The first step is to download or clone my Github Repository. Then, on the command line, simply run:

mvn clean package

Copy the jar file to a directory of choice and create a config.properties file with the properties according to the documentation. An example config:

broker.host=localhost
broker.port=1883
mqtt.clientId=mqttbot

irc.hostname=irc.freenode.net
irc.port=6667
irc.nickName=mqtt_bot_
irc.channels=#myircchannel1,#thesecondchannel

The next step is to install a MQTT broker locally. To do this, go to http://www.hivemq.com and download the latest version. HiveMQ is an advanced enterprise MQTT broker which is made for use cases where scalability, extensibility and reliability is key. It is also perfect for private MQTT projects. Please follow the quick start at here to install HiveMQ.

After installing the HiveMQ MQTT broker locally, start the bot and try publish a MQTT message with a tool of choice on the topic „irc/#%yircchannel1“. Now your message should appear in the corresponding IRC chat.

Of course it is also possible to get all messages via MQTT. Just subscribe to the topic „irc/%myircchannel1/messages“ and you should receive all messages of the IRC chat.

Huh? Why should I do that?

At first sight this does not make any sense why one would do that. When taking a second look, you will realize that you could connect any things to a chat with humans. You could send an IRC message when someone enters a door, when your Jenkins has build results, when a Github Commit occurs, and so on.

Also, you may probably want to get a Andorid Push Notification when someone writes your name in an IRC chat. And if you think this does not make any sense, at least it was fun hacking on :-)