To enable communication between MQTT devices, it’s necessary to use a MQTT broker as the central server for your M2M communication. Although there are some public brokers available like mqtt-dashboard.com, it’s a good idea to set up an own server for playing around. This post shows how to set up a HiveMQ MQTT server instance on Amazon Web Services Elastic Compute Cloud (EC2). As an additional goodie, we want to enable MQTT over websockets, so every browser can be a full-featured MQTT client!
Step 1: Create a new EC2 instance
General
The first step is to launch a new EC2 instance. In general it does not matter which OS you choose for HiveMQ as it runs perfectly on every major OS. Any Linux distribution should be fine, I will use a Ubuntu 12.04 LTS. To get started, a Micro Instance will be sufficient, if you need real power and throughput, you should start with more RAM and more vCPUs.
Security groups
Security Groups are very important to configure correctly, otherwise we won’t be able to connect to our server correctly.
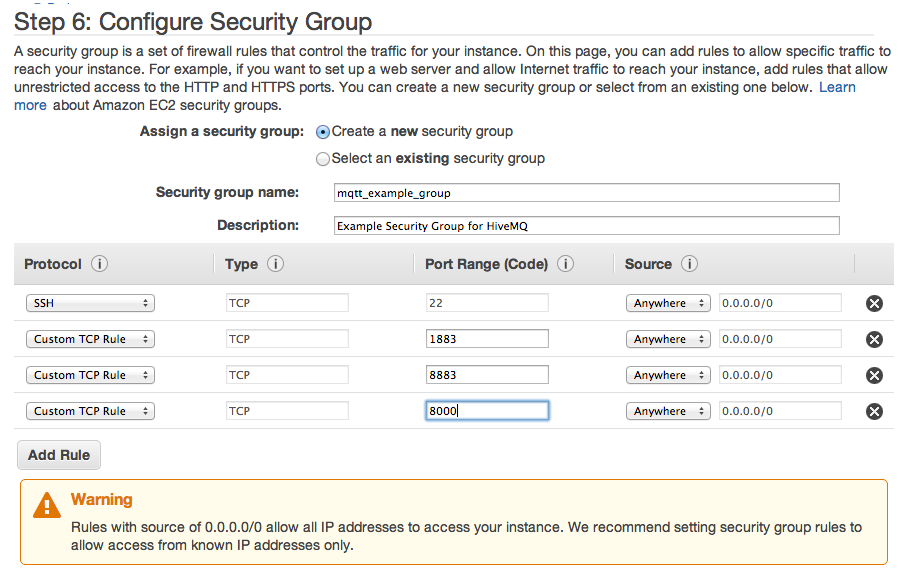
AWS MQTT Security Group Settings
Open the following ports to the outside world for maximum MQTT pleasure:
- 22: Needed for SSH. You probably lock yourself out if your don’t have this port open. Consider restricting this port to your IP adress(es) only.
- 1883: The MQTT standard port
- 8883: The MQTT standard port for MQTT over TLS.
- 8000: The port we want to use for MQTT over websockets
Step 2: Download and install HiveMQ
After launching EC2 instance, we should SSH into it to install Java and HiveMQ. Depending on your OS, these commands might be a bit different.
Install Java + Utils
First we want to install Java and needed utilities. Execute the following commands:
sudo apt-get update sudo apt-get install openjdk-7-jre-headless unzip |
Now you can run
java -version |
and the output should look like this:
java version "1.7.0_25"
OpenJDK Runtime Environment (IcedTea 2.3.10) (7u25-2.3.10-1ubuntu0.12.04.2)
OpenJDK 64-Bit Server VM (build 23.7-b01, mixed mode)
Install HiveMQ
Now we just have do download HiveMQ and unzip it. Execute the following:
wget --content-disposition http://www.hivemq.com/downloads/releases/latest unzip hivemq-1.x.x cd hivemq-1.x.x |
Configure HiveMQ
HiveMQ comes with sensible defaults and we could get started without modifying the configuration if we don’t need websockets support. But since MQTT over websockets is just awesome, we’ll enable it:
Edit the conf/configuration.properties file and change the following values:
websockets.enabled=true websockets.port=8000 |
Step 3: Start HiveMQ
Now just run bin/run.sh and HiveMQ should start up. Verify to see an output like this:
2013-11-30 23:04:46,872 INFO  - HiveMQ home directory: /home/ubuntu/hivemq-1.4.2
2013-11-30 23:04:46,876 INFO  - Starting HiveMQ Server
2013-11-30 23:04:50,225 WARN  - No license file found. Using free personal licensing with restrictions to 25 connections.
2013-11-30 23:04:50,832 INFO  - Activating statistics callbacks with an interval of 60 seconds
2013-11-30 23:04:50,833 INFO  - Activating $SYS topics with an interval of 60 seconds
2013-11-30 23:04:52,053 INFO  - Starting on all interfaces and port 1883
2013-11-30 23:04:52,069 INFO  - Starting with Websockets support on all interfaces and port 8000
2013-11-30 23:04:52,076 INFO  - Started HiveMQ 1.4.2 in 5207ms
That was all. Now you have a high performance MQTT server up and running in the cloud and you can start writing your MQTT applications on devices AND in the browser.
P.S. You can test the MQTT over websockets support with the nifty Websocket Browser Client here


Hi Dominik,
Great post, thanks.
The HiveMQ installation was quite easy but I´m not able to connect the HiveMQ server. I got a connect time out exception over 8000 and also over 1883.
Do you have any hints for solve the problem?
Best regards
Tom
Hi Tom,
did you set the security groups properly? Make sure your security group settings look like the ones in the screenshot.
Another problem could be that the Linux firewall (iptables in most cases. On Ubuntu it may be sufficient to disable ufw) blocks the ports and they must be enabled. You could try with disabling the firewall completely to test. Of course this isn’t recommended on production systems 😉
Let me know if this helps.
Hi Dominik,
that’s a great post, thank you. I’ve been reading through your posts about mqtt. I wanted to ask you a question about mqtt over websockets. Because all the examples that I’ve found use ‚eclipse paho mqtt javascript client‘, I don’t know if there’s a way to hide information that you send through javascript mqtt client like ‚topic, message, clientId, etc..“?
Best regards,
Valon
Hi Valon,
Eclipse Paho is the only MQTT javascript client (which are not node.js based) I know that works
Since it’s Javascript in the browser, there is not really a way to hide things. If you want to make sure that no one can read your data on the wire, use SSL (= https on webpages). In this case make sure you are enabling secure websockets: http://www.hivemq.com/docs/hivemq/1.4.4/#secure-websockets-configuration-chapter
Does this help you further?
Hi Dominik,
Thank you for the post, it’s great. I’ve installed it on Amazon EC2 Ubuntu 14.04 Server. I can access and post messages through HiveMQ Websocket Browser Client, however when I try it from my phone, with the application called MyMQTT server refuses connection. Do you any ideas why it can be?
Thanks,
Amil
Hi Amil,
did you check the following?
* You are using the MQTT port (1883) instead of the Websocket port with MyMQTT
* You disabled or configured the firewall correctly (IPTables)
* You configured the Security Group correctly so port 1883 is free
Does any of these tips help? Let me know if that works for you!
Dominik
Hi Dominik,
Could you please provide us a solution to run HiveMQ broker in background and store data from subscription topics to MySQL database using PHP. We’re running HivqMQ in AWS EC2 Linux instance as Apache, PHP.
Thank you
My Hivemq server connecting from client tool without user name and password. How to enable authentication mode . Hivemq installed in Ubuntu 13.10 version
Hi rajesh,
you can use one of the HiveMQ plugins in the HiveMQ plugin directory. For example you can use the file authentication plugin (see http://www.hivemq.com/plugin/file-authentication/)
If you want to prefer authentication with Stormpath, the Stormpath plugin may be for you (http://www.hivemq.com/plugin/stormpath-plugin/)
Of course you can also write your own, get inspired here: https://github.com/dobermai/hivemq-rest-auth-plugin
Hope that helps,
Dominik